Monday, September 26, 2005

ARE WE PERFECT YET?: Assessing our Images: The MLO

We are responsible for assessing patient images not only for diagnostic adequacy but also for jurisdictional accreditation of our departments and for certification of our own licenses. This becomes an awesome obligation and often a source of great stress for the mammographic technologist. Evaluation of patient images follows certain established criteria. Assessment simply follows these guidelines.

WHAT MUST WE SEE IN THE MLO PROJECTION?
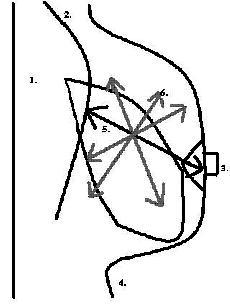
  1. PECTORALIS CONVEX & BELOW NIPPLE LEVEL
  2. AXILLARY TAIL
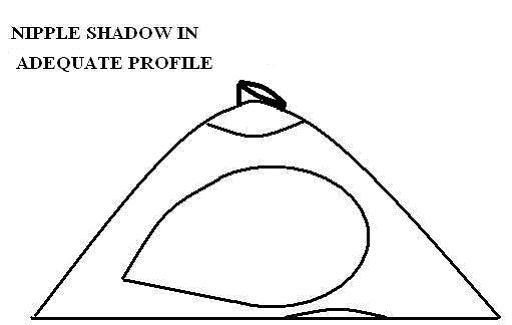
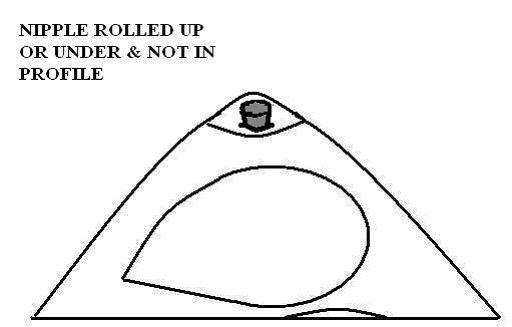
  3. NIPPLE IN PROFILE
  4. IMF OPEN AND ADEQUATELY VISUALIZED
  5. PNL WITHIN 1CM OF CC
  6. TISSUE SPREAD EVENLY AND ADEQUATELY SEPARATED

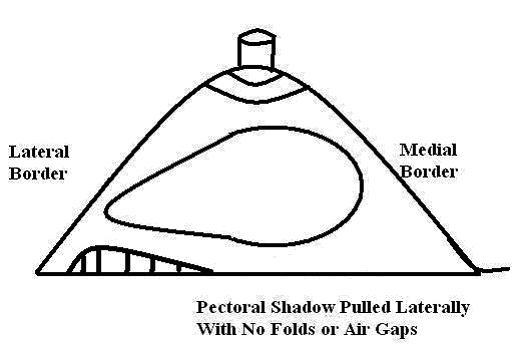
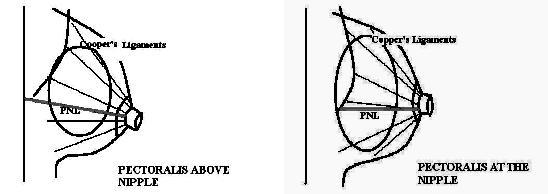
HOW DO WE MEASURE THE PECTORALIS?

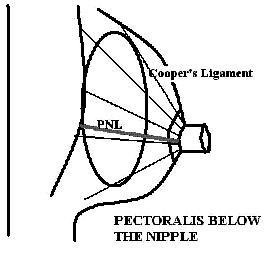
We draw a line parallel to the Cooper’s ligaments from the nipple base to the pectoral shadow or the film edge which ever comes first; where the PNL intersects with the Pectoral shadow shows us if we are above the nipple, at the nipple or below the nipple.
WHEN IS THE PECTORAL SHADOW CONVEX?

To calculate the convex nature of the pectoral shadow, hold a straight edge from the top outer aspect of the pectoral to the bottom corner. If there is muscle showing in front of the ruler, the shadow is convex. If there is breast tissue or fat showing behind the ruler the muscle is concave.


WHEN IS PECTORAL MUSCLE CONCAVE?


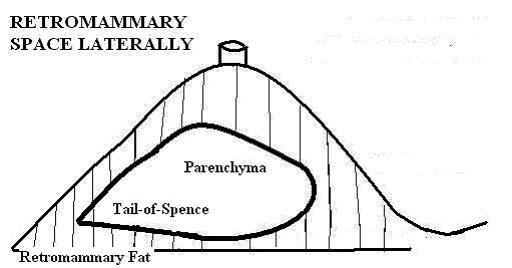
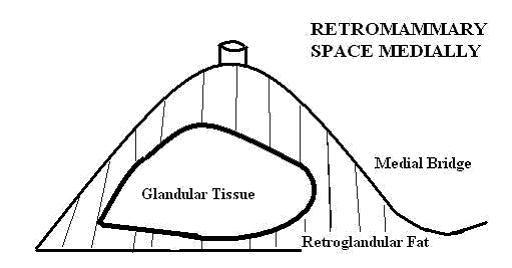
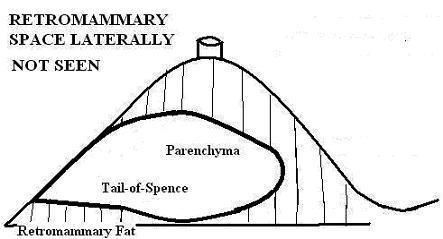
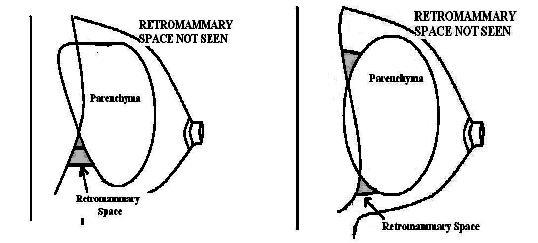
WHEN IS THE RETRO-MAMMARY SPACE SEEN?


If the retro mammary space is not demonstrated behind the parenchyma on the MLO view we have not seen all the breast tissue that is at risk. To avoid missing breast cancers we must understand when the tissue is adequately seen and when it is not and extra images are called for.


WHEN IS THE RETRO-MAMMARY SPACE NOT SEEN?

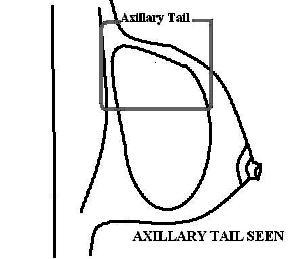
WHEN IS THE AXILLARY TAIL FULLY DEMONSTATED?

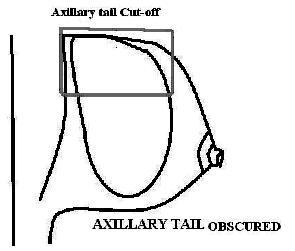
To ensure the axillary tail is adequately seen on the MLO projection, the tail-of-Spence should be clearly visible at the superior border of the image. There should be a line of retro mammary fat above the superior parenchymal edge. A gently curving edge of tissue should be visible leading up toward the axilla.

WHEN IS THE AXILLARY TAIL NOT FULLY DEMONSTATED?

WHEN IS THE BREAST ‘UP & OUT’?


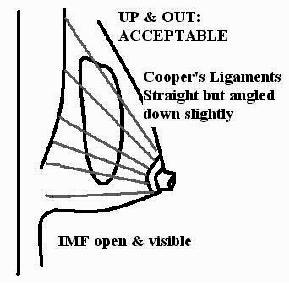
If the breast is perfectly up and out in the oblique view the pattern of the cooper’s ligaments should be perpendicular to the chest wall. If the cooper’s ligaments are at least straight from the nipple base back to the chest wall, the up and out position of the breast is adequate.

Breast In Perfect ‘Up & Out’ Position:


Breast Adequately ‘Up & Out’:

WHEN IS THE BREAST NOT ‘UP & OUT’?

Breast NOT ‘Up & Out’:
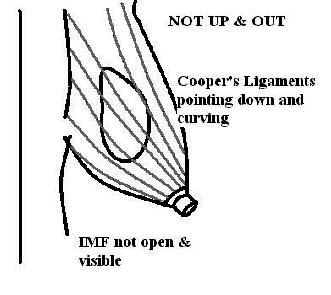

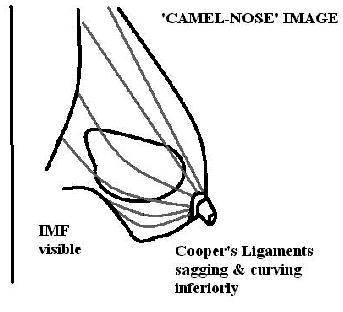
Breast In ‘Camel nose’ NOT ‘Up & Out’:

WHEN IS THE IMF OPEN AND ADEQUATELY VISUALIZED?

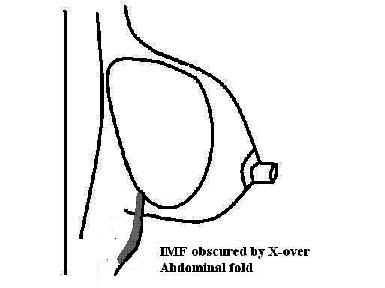
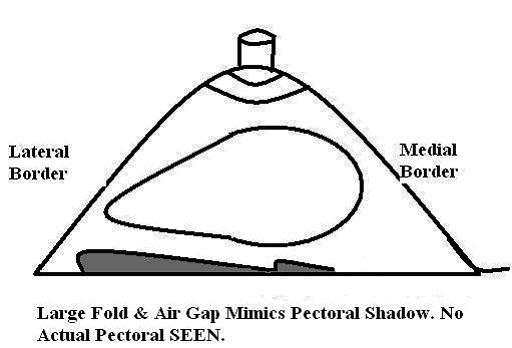
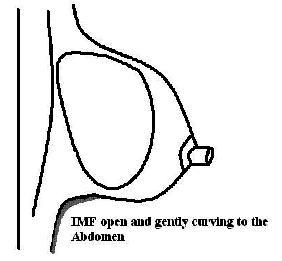
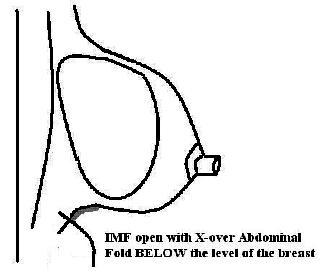
This is the most common error made by technologists when assessing their images for accreditation or certification submission. Many of us misinterpret a large fold of abdomen imaged at the back of the breast as inframammary fold. A bright light will help determine what we are observing at the inferior aspect of our images.

The true IMF will be grey, like fat and skin. It will appear as a gentle curve beyond and below the parenchyma. Again, a hot light will tell us for sure that we are seeing IMF and not a big fold or wrinkle surrounded by air.

IMF Open and Clearly Demonstrated

IMF Open and Seen Just Above a fold of Abdomen BELOW the Level of the Breast
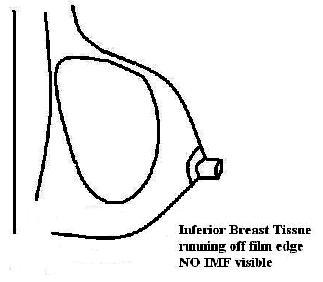
WHEN IS THE IMF NOT OPEN AND ADEQUATELY VISUALIZED?

Summary:

Our mission as mammographers gets more complicated every year. We are called upon to assess patients, images, equipment and services. Breast imaging is complex but not beyond skills. Everything follows certain recognized standards, adhere to these and things will not seem so demanding.

Wednesday, August 17, 2005

ARE WE PERFECT YET? Assessing our Images: The CC

We are responsible for assessing patient images not only for diagnostic adequacy but also for jurisdictional accreditation of our departments and for certification of our own licenses. This becomes an awesome obligation and often a source of great stress for the mammographic technologist. Evaluation of patient images follows certain established criteria. Assessment simply follows these guidelines.

WHAT MUST WE SEE IN THE CC PROJECTION?

  1. MEDIAL NUB
  2. NIPPLE IN PROFILE
  3. TAIL OF SPENCE
  4. PECTORAL SHADOW
  5. TISSUE SPREAD ADEQUATELY
  6. PNL WITHIN 1CM OF MLO

WHEN DO WE SEE THE MEDIAL CROSS-OVER?


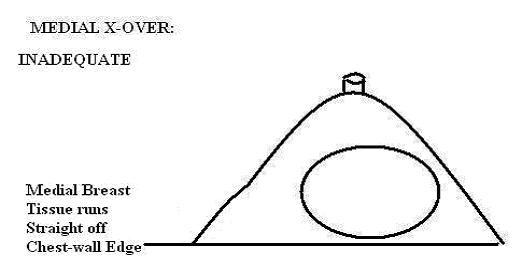
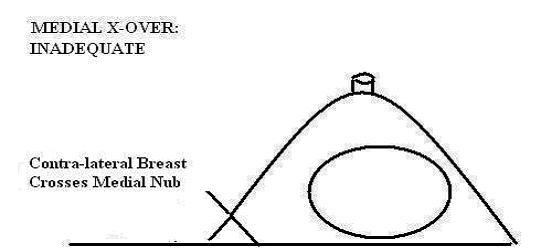
WHEN DON'T WE SEE THE MEDIAL CROSS-OVER?


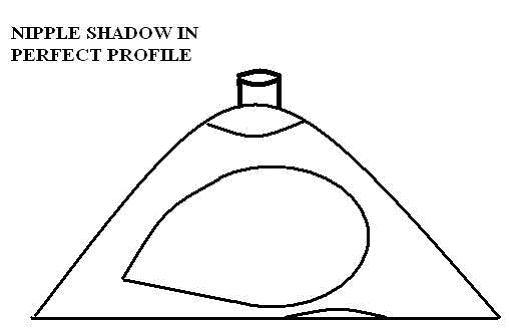
WHEN DO WE SEE THE NIPPLE IN PROFILE?


WHEN DON'T WE SEE THE NIPPLE IN PROFILE?


WHEN DO WE SEE RETRO MAMMARY SPACE?

WHEN DON’T WE SEE RETRO MAMMARY SPACE?

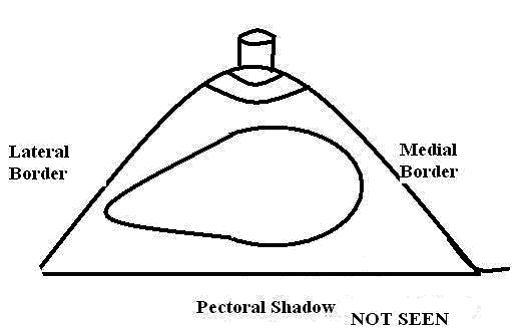
WHEN DO WE SEE PECTORAL SHADOW?
Perfectly Demonstrated Pectoralis


Adequately Demonstrated Pectoralis

WHEN DON'T WE SEE PECTORAL SHADOW?

MEASURING THE POSTERIOR NIPPLE LINE

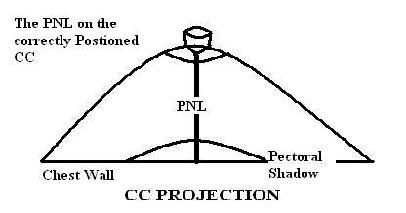
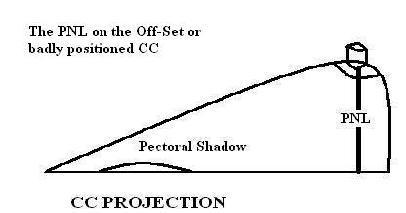
The PNL on the CC projection is ALWAYS measured from the base of the nipple directly back to the film edge. The measurement is taken this way irregardless of pectoralis shadow or improper positioning.

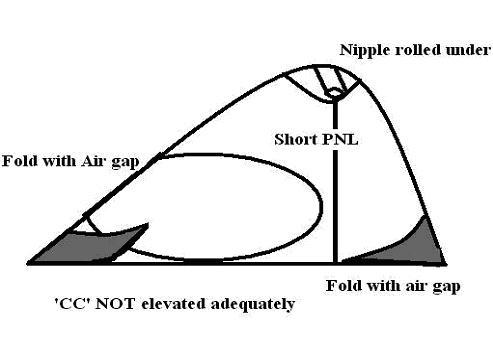
IS THE BREAST ADEQUATELY ELEVATED?

Summary:
Our mission as mammographers gets more complicated every year. We are called upon to assess patients, images, equipment and services. Breast imaging is complex but not beyond skills. Everything follows certain recognized standards, adhere to these and things will not seem so demanding.
Saturday, July 16, 2005

The Posterior Nipple Line: What, How & What for?

There seems to be a big misunderstanding regarding the posterior nipple line, or PNL, as a tool for evaluating the efficacy of our routine mammographic views. That is exactly what the PNL should be; a tool. A method to help us tell if all the tissue is on the images we have produced.

The PNL dimension must be within 1cm of measured distance on both the CC and the MLO projection. If the PNL is much shorter on one view than the other, there is inadequate tissue on that projection.

Measuring the PNL on the CC projection:

The posterior nipple line in the cranial-caudal projection is measured from the nipple base junction directly to the back of the image. The PNL on the CC is always calculated to the very back of the film edge regardless of the image of the pectoral shadow. The PNL on the CC image MUST be within 1cc of the PNL on the MLO view. Obviously, these measurements loose validity if your MLO was positioned poorly. However, the PNL still provides a simple mechanism for comparative assessment of the adequate depth of the CC projection.

THE PNL ON THE CC:

Measuring the PNL on the MLO projection:

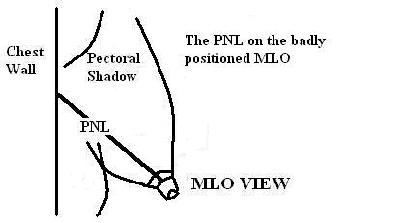
The Posterior Nipple Line on the MLO view should be measured from just behind the nipple base directly parallel to the cooper’s ligaments to the front of the pectoral shadow or to the film edge, which ever comes first. The PNL on MLO should be gauged by placing your straight edge 90˚ to the edge of the pectoral shadow and sliding it down to the base of the nipple. The PNL of the MLO must measure within 1cm of the PNL on the CC.

MEASURING THE PNL ON THE MLO:


SUMMARY:

Sometimes, it is true that a picture is worth 1000 words. Describing the PNL is difficult and often confusing but it is an excellent device for us to ensure our breast images are accurate, complete and diagnostic. The PNL measurement should not become an embarrassing test for us; it should be a very useful tool.

The criteria used for the PNL span is established in articles published by Kopans, Eklund and Cardivosa. These conventions for measuring this parameter are used in the facility accreditation process and in the technologist’s certification procedure.

Thursday, June 16, 2005

THE MLO: Never Simple; Sometimes Impossible!

OBJECTIVES

The MLO view is difficult at best; in training we go over it again and again trying to unravel the intricacies of this projection. Then, just when we think we have it right, a patient shows up whose body habitus does not follow any of the rules. There are a few measures we can take to help us in these sometimes frustrating circumstances.

The “WEE MOUSY”


The tiny patient presents some unique problems when come to adequately demonstrating all the tissue in the MLO projection.

  • Reduce the angle somewhat for the MLO.
  • This patient’s pectoral muscle is usually short and flat (35˚- 45˚).
  • Concentrate on the axillary tail and the pectoral for this view.
  • If needed do a 90° LM to demonstrate the IMF and inferior breast tissue.


The “14x17”

Who said 24x30 was the largest film size one needs for mammography. The very large patient presents her own set of logistical problems when attempting to capture all the tissue in a precise and organized manner.

  • Mark the breast carefully:
  • Use nipple markers
  • Use superior and inferior markers
  • Use your projection markers ALWAYS correctly at the axilla side of the image
  • Reduce the angle when acquiring the MLO views to help fight gravity ( up and out can be a very long trip)
  • Take your time and map the breast carefully. IT IS VERY EASY TO GET LOST!
  • There is nothing sadder (or madder) than a radiologist lost in a large breast


MS. PANCAKE


Ms. Pancake is very often the close companion of Mrs. 14X17 and Mme. Pretzel. Her breasts are empty and flaccid. They lay flat and unnoticed against her rib cage. How to handle this flimsy floppy tissue without wrinkles and folds can be a nightmare.

  • Use an appropriate size bucky. The pancake breasts tend to spread and spread and spread like flowing water.
  • Reduce the angle of the MLO to 30-40˚. This makes the thin floppy tissue easier to control
  • Scoop the breast tissue and move it medially toward the sternum
  • Flatten the tissue of the breast forward towards the nipple and smooth the wrinkles (don’t pull back toward the shoulder)
  • When the MLO is in place and the skin is spread forward; place your hands on the superior and inferior edges of the breast and stretch the tissue flat from top to bottom

The “BANDEAU BATHING SUIT”

The patient with little or no demarcation between her breasts can be a real challenge. The bandeau bathing suit or Uni-Breast leaves little clue as to where the left breast leaves off and the right breast begins. It seems to be impossible to position one breast without the other one getting in the picture or pulling the breast of interest out of place. The answer of course is to work with what you are presented with and not to fight the existing anatomy

  • Acquire a reduced angle MLO to demonstrate the anterior breast tissue, the retro mammary space and the posterior fascia.
  • The reduced angle MLO may demonstrate a slip of contra lateral breast tissue
  • Therefore, if necessary take an additional 90° LM view to open the IMF and demonstrate the inferior breast tissue.


The “PRETZEL”


This is our most delicate and fragile patient. She is elderly, frail, bent, brittle and thin skinned. Her osteoporosis, arthritis, roto-scoliosis, kyphosis and muscular-skeletal woes make this patient a virtual puzzle to image. It seems a daunting task to obtain a CC view free of jaw, skull, shoulder, sternum or ribs. There are a few tricks that will help you and help this most vulnerable patient as well.

  • DO NOT fret about getting perfect images on this patient
  • Just demonstrate as much as you can without doing any damage
  • Acquire SIO or LMO views to accommodate Rotoscoliosis
  • Acquire 90° LM views to demonstrate the IMF and the inferior breast tissue
  • Use cornstarch or resin powder on your hands to assist with grip and protect the delicate skin
  • HANDLE WITH CARE! This patient can break very easily


“PENELOPE THE BODY BUILDER”


Penelope is a very difficult client. She is large and muscular with a thick layer of adipose tissue. Her breasts are very small but she has huge thick pectoral grids and bulky upper arms. Penelope is not very agile and has trouble cooperating with the positioning. What to do, oh what to do? Our best that is all we can do.

  • Acquire 1 set of MLO views with a reduced angle 35-45° on 24x30 films to demonstrate the thick unyielding posterior breast tissue against the pectoralis.
  • Acquire a 2nd set of 90° LM views on 18x24 films to see the nipple in profile and the anterior breast tissue properly compressed.
  • WARNING Penelope often sees herself as delicate. Don't assume she is as sturdy or brave as she appears: She really is a big old Teddy Bear

“PECTORALIS CARNAVATUM” (THE PIDGEON)


Women with this sternal abnormality used to be called “chicken breasted”: Not very politically correct but descriptive. The sternums in woman with this chest configuration have sternal bodies which bow out into a convex curve. The boney protuberance between the breasts seems to crash into the compression paddle long before we get anywhere near the breast tissue. There are again a few simple tricks to work around this thorny problem.

  • Acquire a reverse oblique
  • Place the sternum against the bucky
  • Raise the patient’s arm up over the top of the receptor
  • Carefully compress from the lateral side while avoiding the Latissimus Dorsum
  • Viola, a near perfect oblique without scraping the paddle over the sternum
  • No skin abrasion, no bruising and very little patient discomfort

“PECTORALIS EXCAVATUM” (THE CROSSED HEART)


This sternal malformation has the patient’s sternum and ribs bowing in toward her spine. This presents a challenge to obtaining a good MLO projection. The medial borders of the breasts are pulled together and in toward the sternum with no discernible method of getting the bucky and paddle in-between them. With a little ingenuity we can make this situation less frustrating and more controllable.

  • Acquire a SIO or superior/inferior oblique
  • Angle the bucky appropriately
  • Angle the patient slightly toward the edge of the bucky and more or less wedge the sternal border against the bucky
  • Raise the patient’s arm up over the top of the receptor
  • Carefully compress from the lateral side while avoiding the Latissimus Dorsum
  • Viola, a near perfect oblique capturing most or all of that elusive medial tissue tucked into the sternum.

CONCLUSION

Breast imaging presents a difficult and diverse set of challenges. None of it is easy, especially the MLO projection. These tips are designed to help. Keep them handy, use them liberally.